Sunday, September 5, 2010

Books

Books3

Jen's books photo is on the left, Al's books photo is on the right.
Share/Bookmark

Sunday, August 22, 2010

T-Shirt Refashion

Yesterday, I received a big box from Alicia stuffed full of super fun crafts to work on. I'm so excited to get going on all of them! This morning, I decided to sit down with the t-shirt refashion project she sent me.

At first, I felt completely out of my league - I've never sewn an adult sized piece of clothing, not even from a pattern! I wasn't sure I was going to have any idea what to do. But, I started sketching some ideas and then they just started tumbling in. It's so fun to run free with a project, without a "destination" in mind! With so many different ideas flying around, it felt a bit like listening to the make believe games my son and daughter play. They go something like this:

Her: Ok, pretend we're checking in to a hotel and going on vacation. Look at my pink suitcase - it has wheels!

Him: Right, ok. And then ninjas infiltrate the hotel lobby! And it's all hi-ya and whip-pew!

Her: Uh, ok. Then, me and my sister put on our pretty swimsuits and go to the pool.

Him: Yes! And we can have a race!

Her: Uh huh, or maybe we could try on clothes.

The project can take a lot of different directions, is what I'm saying.

I started out by completely forgetting to take a picture of the t-shirts Al sent me, and the pretty beads and handy organizer she packed in. Picture two brown t-shirts in a smaller and larger size.

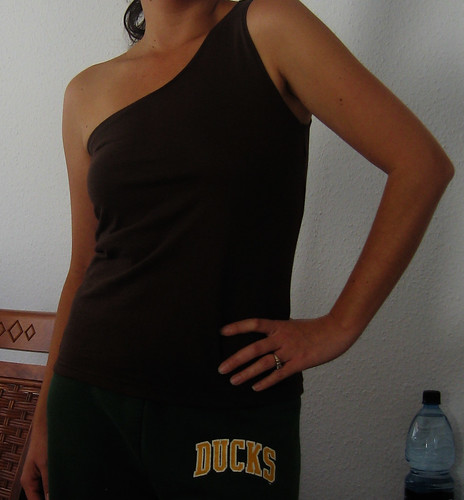
I cut the smaller t-shirt down, giving it a one shoulder shape.

t-shirt refashion


Then paired it with my sweats.

t-shirt refashion


The larger t-shirt was to be used for embellishing, but I'm just not really a ruffles and flowers kind of girl. I like clean lines and solid colors, most of the time. (In fact, Al asked me a few weeks ago what colors I like to wear the most. I said brown. She asked what do you like to pair with brown? I said, often other browns. Ha ha! I understood why she had asked when I got my two brown shirts. Also, I laughed. She definitely listened!)

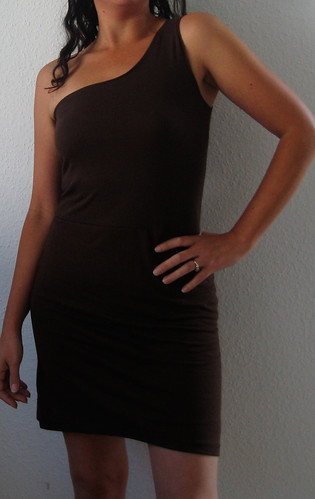
So, what to do with the larger t-shirt? While the one shoulder tank was sure comfy with my sweats, I decided it would be fun as a dress! So, I cut the shirt into a skirt.

I'm not going to go over all the steps I did because there are a dillion t-shirt refashion tutorials out there - all done by much better sewers than myself! I have no idea if I even did any of it the "right" way or not. This was definitely an exercise in trial and error - heavy emphasis on the error.

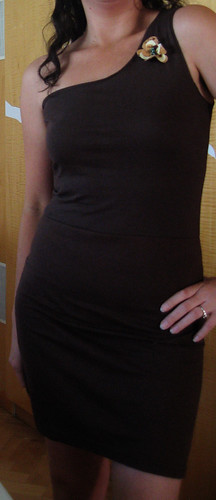
But, once I was done, this was what I had made. (I chopped my head off in the following pictures because I apparently make ridiculous faces while trying to photograph my whole self.)

t-shirt refashion


I thought it would be fun paired with a big belt.

t-shirt refashion


But, I also did want to use some of the pretty beads Al had sent. So, I cut out a few pieces of scrap fabric I had and beaded a little seed center for the flower. Here it is up close:

t-shirt refashion


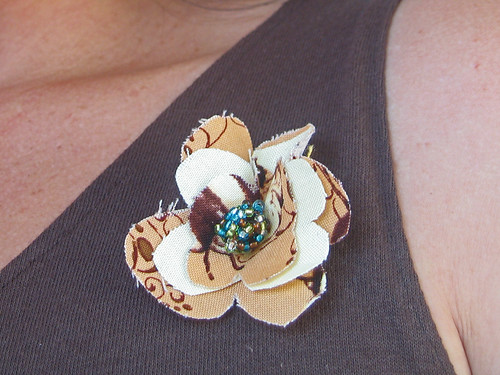
And pinned to the dress:

t-shirt refashion


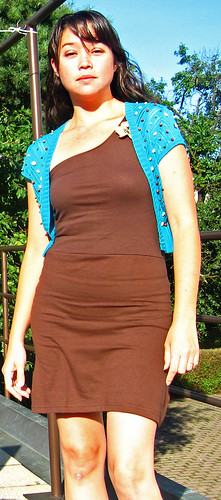
And, finally I braved the mirth of my numerous neighbors (Germany is very compact) and got a picture in true light to show you how I'll probably wear the dress most often - with one of my favorite shrugs:

t-shirt refashion

Share/Bookmark

Tuesday, August 17, 2010

TeamPrints: Thanks for being sweet!

You guys are really sweet, and I thought really, what better way to commemorate that than with lollipops and rainbows!? So, I present to you very sweet people, sweet lollipops and rainbows on printable retro bi-fold notecards. Just print on cardstock, trim off the attribution, cut vertically in half and fold into notecards! Then, let somebody else know how sweet you think they are!

Printable thank yous


Download the pdf here. (It looks off, but will print correctly. Please let me know if it doesn't!)

printable thank you

Share/Bookmark

Monday, August 16, 2010

Our Winner

is comment number:True Random Number Generator  60Linda!Congratulations!  Please check your email and enjoy the bag!And thanks to everyone for your entries and a big welcome to all our new followers, thanks for taking notice of us.  :)
Share/Bookmark

Sunday, August 15, 2010

More Elephants!

Jen sent me the cutest craft for this round.  I sense that she's loving elephants lately.  I can see why, these little guys are adorable.
effie & ollie by Heather Bailey


She bought fabrics from Heather Bailey's Nicey Jane line called "Wash Day Ticking-dandelion" and "Lindy Leaf-blue".  She also sent three options of felt colors for the embellishments.

I've never sewn anything from Heather Bailey's projects before, but these are great.  The directions are easy to follow, even if this was one of the more complicated sewing projects I've ever done.  I cut the pieces,
Looking like an elephant already!
and followed the piecing directions, attaching the ears to the head, the tail to the rear end, and then the most difficult part, pinned the side of the body to the underside, trunk gusset and body gusset.  Once the first side was done, these pieces held their shape better to pin to the second side.

First side sewn on, corners clipped


Second side pinned on, ready to sew!

Ready to be stuffed.
The only critique I have about this pattern is that at this point the directions tell you to go ahead and stuff ollie full of stuffing and sew him up.  The next step is to add french knots for his eyes.  I think you need to add the eyes BEFORE the stuffing goes in so that your knotted tail end of thread can be on the underside of the fabric.   Since I didn't read ahead (that's so like me with sewing projects, unfortunately) I ended up omitting his eyes.  But that's ok, because first of all, on one side the pattern of the fabric made it look like he has an eye:
See the little green eyebrow over the yellow eye?  Or am I the only weirdo out there?

And second of all, I'm using ollie as a pincushion instead of a toy, so:

At this point, I had "pink elephants on parade" stuck in my head

He kind of looks like a pink pearlized prehistoric pachyderm with those  pins on top.  Or maybe a punk pachyderm?


I love this!  I'm looking forward to sewing the second one from the blue fabric and making it effie, with the flowers behind her ears.

Share/Bookmark

Thursday, August 12, 2010

Soft

soft

Jen on the left, Al on the right
Share/Bookmark

Tuesday, August 10, 2010

Our First Tutorial

Lots of firsts around here at Team Awesome this week! Be sure to check out our first giveaway and enter to win the adorable owl bag sewed by Alicia!

Following a fun dandee tutorial, I created little memory games that we are storing in handmade drawstring bags. Since I was making up a few more for friends, I thought I would put together a tutorial for the lined drawstring bags.

067-2


You'll need:

two coordinating fabrics
coordinating thread
a drawstring

And that's it! These really couldn't be any easier.

For this size bag, start with a 10" by 5" piece of your outside fabric. And, two 4" by 5" pieces of your lining fabric. Pin the right sides together like so:

003-1


Stitch a 1/4" seam allowance along the ends of your outside fabric. Then flip the lining fabric out and press the seams toward the lining. Once you turn that over, you'll have this:

005-1


Then, fold the whole piece in half, squaring the ends of the lining fabric (as best you can given your novice cutting skills) and pin together. Mark a 1/2" spot, 3 1/2" up from the fold of your outside fabric. Don't sew this spot, it will be the opening to your drawstring casing. You'll want to backstitch on either end of the gap.

007-1


Stitch the sides, skipping your marked gap. When you get to the end of the lining fabric, keep your needle in and turn the corner to begin stitching the base of the lining.

009-1


Do not stitch all the way across. Leave yourself a 1 1/2" gap, this is where you will pull the bag through to flip right side out. Again, be sure to backstitch on either end of the gap.

015-1


Once you have finished that, it's a good idea to clip your corners. This will help you get sharp corners when you turn the piece right side out.

018-1


Flip your piece out, through the gap you left in the lining fabric. Then, slipstitch the gap in the lining closed. You could topstitch if you'd like, but I find the hand slipstitch creates a smoother line inside your lining.

Then, push your lining down inside your bag. Remember that your lining is shorter than your outside fabric, so be sure to push the corners of the lining all the way in to the corners of the bag. You're almost done! Your bag will look like this:

020-1


And from the inside:

026-1


To sew a base for your casing, stitch a straight line all the way around the bag right above the spot where the lining fabric meets your outside fabric.

Now, it's time to put your drawstring in to your bag. If you're using cording that can easily unravel like mine, it helps to wrap a bit of tape around the end. Then, fold it over and push your safety pin through.

030-1


Thread your cording through and voila!

small lined drawstring bag tutorial

Share/Bookmark